Installing Kubernetes 1.13 on CentOS 7
Este texto é de cariz técnico e está escrito em Inglês
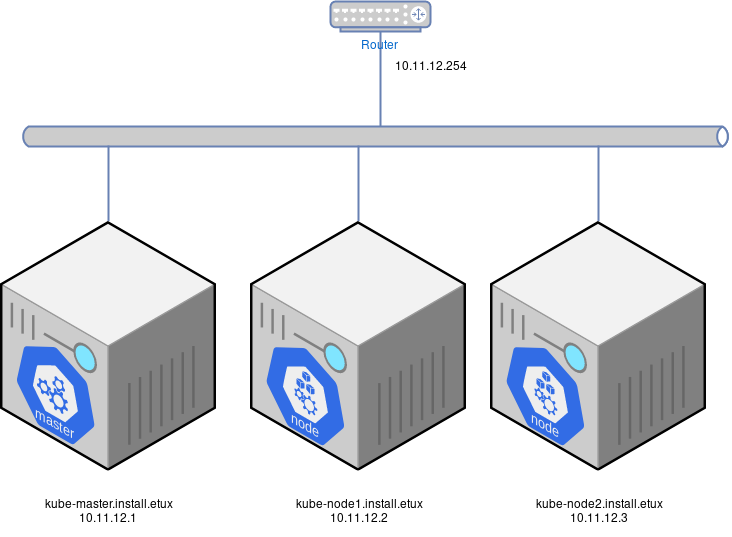
In this post I will try to describe a Kubernetes 3.11 test install on our servers. Its main purpose is to allow the team to have more in-depth knowledge of Kubernetes and its building blocks as we are currently implementing OpenShift Origin and Amazon EKS. The goal is to implement something along the lines of:

Requirements
Install 3 Centos 7.6 servers (can be virtual machines) with the following requirements (please beware that for a production cluster, the requirements should be pumped up):
- 2 vCPUs at least
- 4 GB Ram for the master
- 10 GB Ram for each of the worker nodes
- 30 GB root disk (I will in a later post address some of the “hyper-converged” solutions – storage & compute – and in that scenario, more than one disk is advised)
Next, set the network configuration on those Linux servers to match the above diagram (make sure that the hostname is set correctly).
1 – Set named based communication
All servers need to be able to resolve the name of the other nodes. That can be achieved by adding them to the DNS server zone or by adding the information to /etc/hosts on all servers.
# vi /etc/hosts (on all 3 nodes)
    10.11.12.1 kube-master.install.etux master
    10.11.12.2 kube-node1.install.etux node1
    10.11.12.3 kube-node2.install.etux node2
2 – Disable selinux and swap
Yeah, yeah.. when someone disables selinux a kitten dies. Nevertheless, this is for demos and testing. Make sure that the following commands are executed on all 3 nodes.
setenforce 0
sed -i 's/SELINUX=enforcing/SELINUX=disabled/g' /etc/sysconfig/selinux
swapoff -a
sed -i '/swap/s/^/#/g' /etc/fstab
3 – Enable br_netfilter
Depending on the network overlay that you will be using, the next should or shouldn’t be applied. When choosing Flannel, please run on all nodes:
modprobe br_netfilter
cat >> /etc/sysctl.conf <<EOF
net.bridge.bridge-nf-call-ip6tables=1
net.bridge.bridge-nf-call-iptables=1
EOF
sysctl -p
4 – Install docker-ce
Docker CE has a few interesting features that the version of docker that comes with Centos7 doesn’t have. One of those is the multi-stage docker build. For that reason, I chose to use docker-ce running the following on all nodes:
yum install -y yum-utils
yum-config-manager --add-repo https://download.docker.com/linux/centos/docker-ce.repo
yum install -y docker-ce device-mapper-persistent-data lvm2
systemctl enable --now docker
5 – Install Kubernetes
The kubernetes packages I used are in the projects’ repo. Please run the following commands on all nodes:
cat > /etc/yum.repos.d/kubernetes.repo <<EOF
[kubernetes]
name=Kubernetes
baseurl=https://packages.cloud.google.com/yum/repos/kubernetes-el7-x86_64
enabled=1
gpgcheck=1
repo_gpgcheck=1
gpgkey=https://packages.cloud.google.com/yum/doc/yum-key.gpg
       https://packages.cloud.google.com/yum/doc/rpm-package-key.gpg
EOF

yum install -y kubelet kubeadm kubectl
6 – Reboot all instances
Reboot all 3 instances to make sure that they all are on the same state.
7 – Initialize Kubernetes
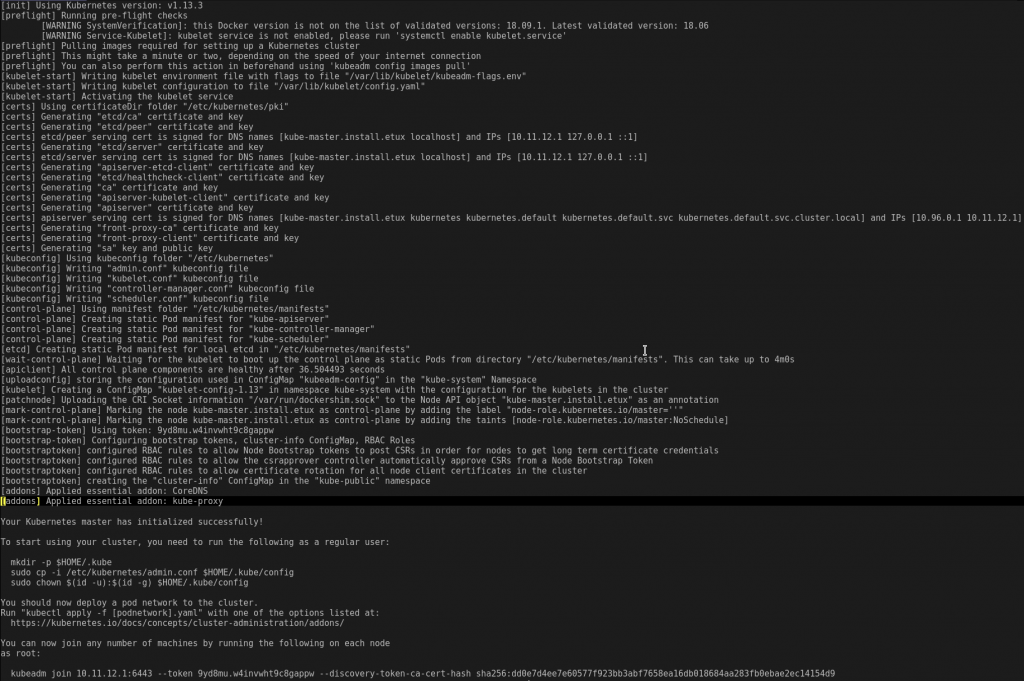
The first step is to initialize the master node with all the services required to bootstrap the cluster. This step should be done on the master node only. Make sure that the pod network cidr is a /16 (each node will “own” a /24) and it doesn’t conflict with any other network you own:
# on master node only
kubeadm init --apiserver-advertise-address=10.11.12.1 --pod-network-cidr=10.11.0.0/16
Before running the kubeadm joinon the other nodes, I first need to create the network overlay.
8 – Network overlay – Flannel
Wait a few seconds and proceed to the network overlay. There are several network plugins available to install. Some of them are:
Why did I choose Flannel? Well.. because I think that it was the easiest to install. I’m still assessing its features and comparing them to the other options to see which one is better suited to our customers.
# only on master
kubectl apply -f https://raw.githubusercontent.com/coreos/flannel/master/Documentation/kube-flannel.yml
9 – Join other nodes to the Kubernetes cluster
Next, go to the node1 and node2 and run the kubeadm command that was displayed on the output you got:
# On node1
kubeadm join 10.11.12.1:6443 --token 9yd8mu.w4invwht9c8gappw --discovery-token-ca-cert-hash sha256:dd0e7d4ee7e60577f923bb3abf7658ea16db018684aa283fb0ebae2ec14154d9

# On node2
kubeadm join 10.11.12.1:6443 --token 9yd8mu.w4invwht9c8gappw --discovery-token-ca-cert-hash sha256:dd0e7d4ee7e60577f923bb3abf7658ea16db018684aa283fb0ebae2ec14154d9
In the end…
In the end you should have a running cluster with some pods running:

Next steps
The next steps on this demo cluster is to install a local registry, the web console and a loadbalancer (MetalLB) but that will be for another blog post.
Escrito por Nuno Fernandes


